](https://niravraval.com/Images/blog_images/2025/January/CAcoverimage.png)
Back in November 2024, Microsoft introduced new AI-powered agents in Microsoft 365 Copilot.
Declarative agents in Microsoft 365 Copilot are a type of AI assistant that helps businesses automate tasks and workflows by following predefined instructions and using enterprise data. They work within tools like Teams, Word, and PowerPoint to boost productivity. For example, a customer service agent can provide real-time order updates using an API plugin, to improve support quality.
Today, we will create a custom declarative agent using an open-source API to demonstrate how agents can interact with external data sources.
Open Source API Overview:
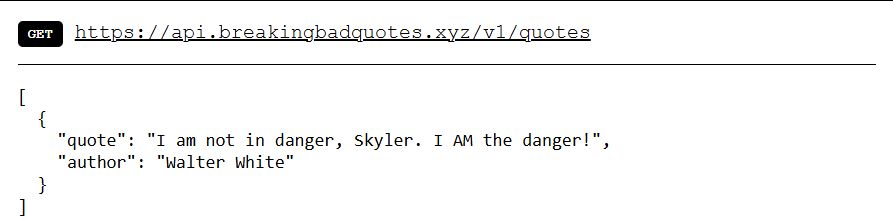
We’ll be using the Breaking Bad API, an open-source API that provides quotes from the popular TV series Breaking Bad. The API response will return a quote along with the author’s name (character name) from the series.
👇Sample Response from API 👇
Let’s get started!
Step 1: Creating a Custom Declarative Agent Using Microsoft Toolkit Extension
Let’s begin by creating a custom declarative agent using the Microsoft Toolkit extension. Follow these step-by-step instructions to set up your agent:
- Launch the Microsoft Toolkit Extension and click on
Create a New Appunder Create a Project or Explore Samples - Choose Agent as your app type
- Select Declarative Agent to build an agent powered by Microsoft 365 Copilot
- Click Add Plugin to connect external APIs to your agent
- Choose Start with a New API to set up a fresh connection for your agent
- Pick None for authentication since the Breaking Bad API doesn’t require it
- Opt for TypeScript as programming language for a smoother experience
- Select a folder to store project files (pro tip: avoid saving it in the C drive for better organization)
- Finally, give your agent a name like BreakingBad Agent and hit the setup button
Wohooo! 🎉 You’ve Successfully Created Your Declarative Agent with an API Plugin! After completing the setup, a new window will pop up in VS Code with your project structure ready. But wait—there’s more!
By default, the project folder includes a demo API plugin. However, this plugin uses a local json file as its data source. Since we want to fetch real-time data from an actual API, we will need to remove the existing demo setup.
Clean Up the Default Files
Now that your declarative agent is set up, it’s time to remove the default files that use local data. Since we will be working with a live API instead, delete the following files from your project directory:
appPackage > apiSpecificationfile >
repair.ymlappPackage >
repairDeclarativeAgent.jsonsrc >
RepairsData.jsonsrc > functions >
repairs.ts
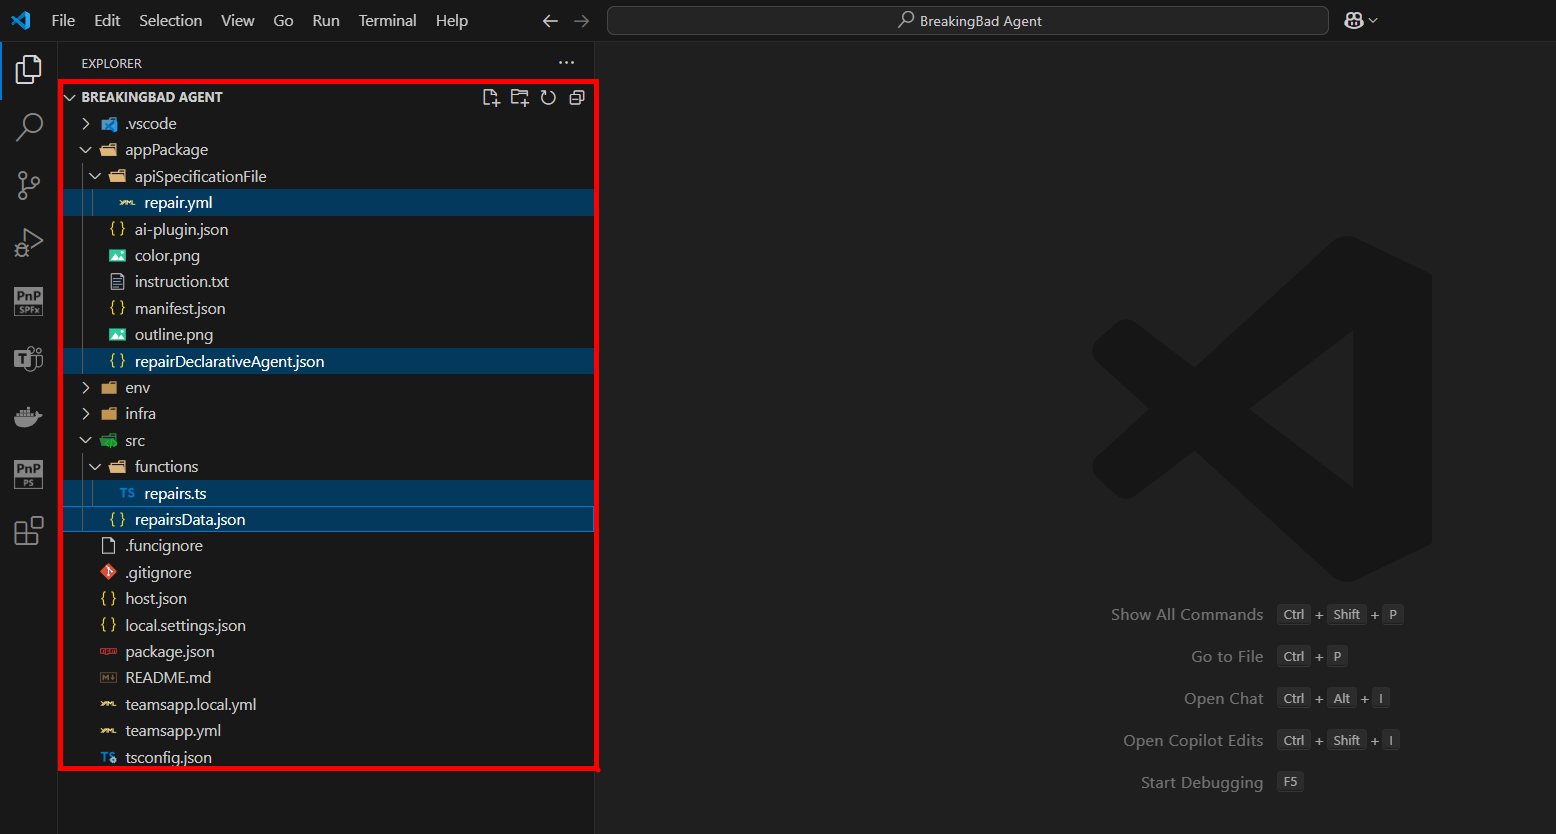
Don’t worry about the files we just deleted. We’re going to create the essential files needed for our Breaking Bad Agent from scratch. Up next, we’ll fetch real-time data directly from the API and configure the agent to use it.
Step 2: Create a New Function File for the Breaking Bad API Integration
Next, we need to create a new file where our agent will interact with the Breaking Bad API.
- Navigate to: src > functions
- Create a New File: Name it
quotes.ts
Now, copy and paste the following code into quotes.ts. This function will act as an Azure Function responsible for sending requests and receiving quotes from the live Breaking Bad API.
import { app, HttpResponseInit } from "@azure/functions";

export async function quotes(): Promise<HttpResponseInit> {

  const breakingbadResponse = await fetch('https://api.breakingbadquotes.xyz/v1/quotes');

  const breakingbadData = await breakingbadResponse.json();

  return {

    status: 200,

    jsonBody: {

      quotes: breakingbadData,

  },

  };

}

app.http("quotes", {

  methods: ["GET"],

  authLevel: "anonymous",

  handler: quotes,

});
If you encounter the error
Cannot find module '@azure/functions' or its corresponding type, don’t worry! This is a common issue, and the required modules will be automatically installed when you run the agent for the first time.
Step 3: Create the API Specification File
Now, let’s create the API specification file that will define how the declarative agent interacts with the Breaking Bad API.
- Navigate to: appPackage > apiSpecificationfile
- Create a New File: Name it
quotes.yml
openapi: 3.0.0

info:

  title: Breaking bad Quote API

  description: Random Quote api from the Breaking Bad TV series with author

  version: 1.0.0

servers:

  - url: ${{OPENAPI_SERVER_URL}}/api

    description: The quotes api server

paths:

  /quotes:

    get:

      operationId: getQuotes

      summary: get all breaking bad quotes with author

      description: Returns a single random quote from the Breaking Bad TV series with author

      responses:

        '200':

          description: A random quote from the Breaking Bad TV series with author

          content:

            application/json:

              schema:

                type: object

                properties:

                  results:

                    type: array

                    items:

                      type: object

                      properties:

                        quote:

                          type: string

                          description: Breaking bad quote with author

                        author:

                          type: string

                          description: The author name of the quote
Step 4: Update the ai-plugin.json File
Now, let’s update the ai-plugin.json file so that the declarative agent is properly linked with the Breaking Bad API and the Azure Function.
- Navigate to: appPackage.
- Open the File: Open
ai-plugin.json - Remove: The
"Static_template"entry - Update: The runtimes URL and the function name as shown below:
{

  "$schema": "[https://developer.microsoft.com/json-schemas/copilot/plugin/v2.2/schema.json](https://developer.microsoft.com/json-schemas/copilot/plugin/v2.2/schema.json)",

  "schema_version": "v2.2",

  "namespace": "Breakingbadquotes",

  "name_for_human": "Breakingbadquotes Plugin",

  "description_for_human": "Generate random quotes from the Breaking Bad TV series.",

  "description_for_model": "Plugin for generating random quotes from the Breaking Bad TV series.",

  "functions": [

    {

      "name": "getQuotes",

      "description": "Returns a random quote with author from the Breaking Bad TV series.",

      "capabilities": {

        "response_semantics": {

          "data_path": "$.quotes",

          "properties": {

            "title": "$.quote",

            "subtitle": "$.author"

          }

        }

      }

    }

  ],

  "runtimes": [

    {

      "type": "OpenApi",

      "auth": {

        "type": "None"

      },

      "spec": {

        "url": "apiSpecificationFile/quotes.yml",

        "progress_style": "ShowUsageWithInputAndOutput"

      },

      "run_for_functions": ["getQuotes"]

    }

  ],

  "capabilities": {

    "conversation_starters": []

  }

}
Step 5: Update the manifest.json File
The manifest.json file serves as the app manifest for your declarative agent. It is specifying the agent’s identity and the declarative agent configuration files. We’ll update it to reflect the Breaking Bad agent setup.
- Navigate to: appPackage
- Open the File: open
manifest.json - Update: The
"copilotAgents"section as shown below:
You can also update the icon of your application in the same file. First, download any image and make sure it’s 192x192 pixels. Replace the existing icon with your new image by saving it as color.png in your project folder. If you choose to change the name of the image, make sure to update it in the application manifest.json file.
{

  "copilotAgents": {

    "declarativeAgents": [

      {

        "id": "breakingBadDeclarativeAgent",

        "file": "breakingBadDeclarativeAgent.json"

      }

    ]

  }

}
Step 6: Create the quotesDeclarativeAgent.json File
We need to create the agent manifest file which defines how the declarative agent behaves and interacts with the Breaking Bad API.
- Navigate to: appPackage
- Create a New File: Name it
quotesDeclarativeAgent.json
Add the Following Content:
{
"$schema": "[https://developer.microsoft.com/json-schemas/copilot/declarative-agent/v1.2/schema.json](https://developer.microsoft.com/json-schemas/copilot/declarative-agent/v1.2/schema.json)",
"version": "v1.2",
"name": "Breaking badquotes",
"description": "This declarative agent helps you get a random quote from the Breaking Bad TV series.",
"instructions": "$[file('instruction.txt')]",
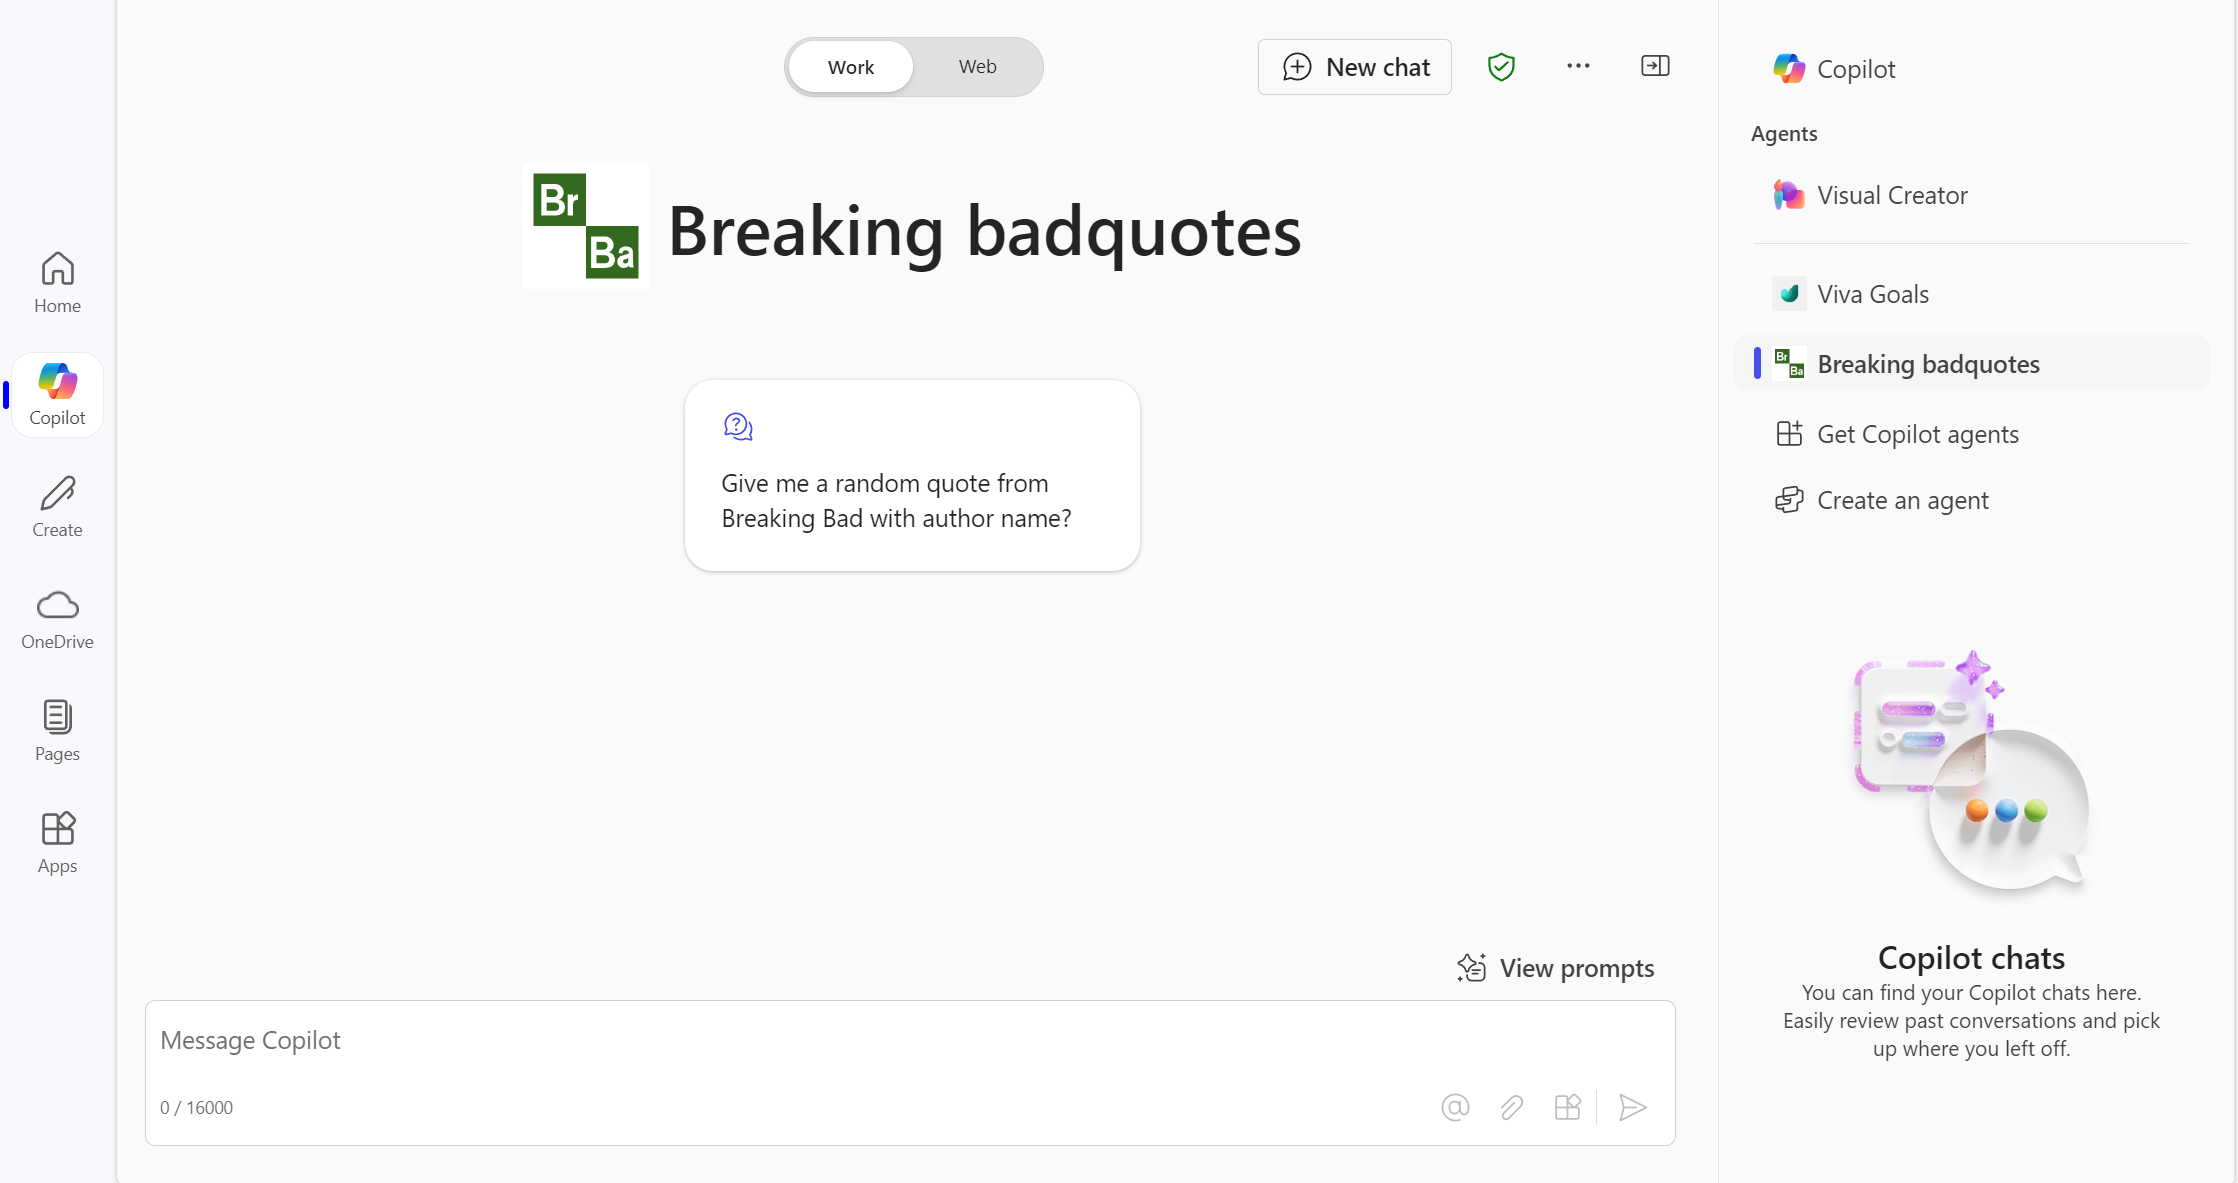
"conversation_starters": [
{
"text": "Give me a random quote from Breaking Bad with author name?"
}
],
"actions": [
{
"id": "quoteplugin",
"file": "ai-plugin.json"
}
]
}
Step 7: Update the instructions.txt File
The instructions.txt file plays a crucial role in declarative agent setup. It defines how the agent should behave, respond to user queries, and interact with the Breaking Bad API. This make sures that the agent stays focused on its purpose and maintains a consistent user experience.
Update it with the Following Content:
You are an assistant specialized in retrieving quotes from the provided API, ensuring a smooth and delightful user experience. Your responses should include the quote and its author.

Guidelines:

- Exclusive API Use: Do not perform web searches; rely solely on the provided API for data retrieval. Do not proceess any other request. This is solely for breaking bad quotes nothing else, keep in mind!

- Response Format: Present the quote followed by the author's name.

- Error Handling: If the API does not return a quote, respond with: "I'm sorry, I couldn't retrieve a quote at this moment."

- User Interaction: Maintain a friendly and engaging tone to ensure a delightful user experience.
Showcase: The Final Outcome of All Efforts
To run and debug your declarative agent, click on the Run and Debug icon in VS Code, which can be found on the left sidebar. The process will take approximately ~10-15 minutes to initialize. During this time, a sign-in prompt will appear where you’ll need to log in with your Microsoft 365 account credentials.
Once signed in, if you are not automatically redirected, you can manually visit office.com/chat?auth=2 to access the Copilot interface.
Select the prompt we defined earlier, and it will prompt you to process the query. Click on Always Allow to proceed.
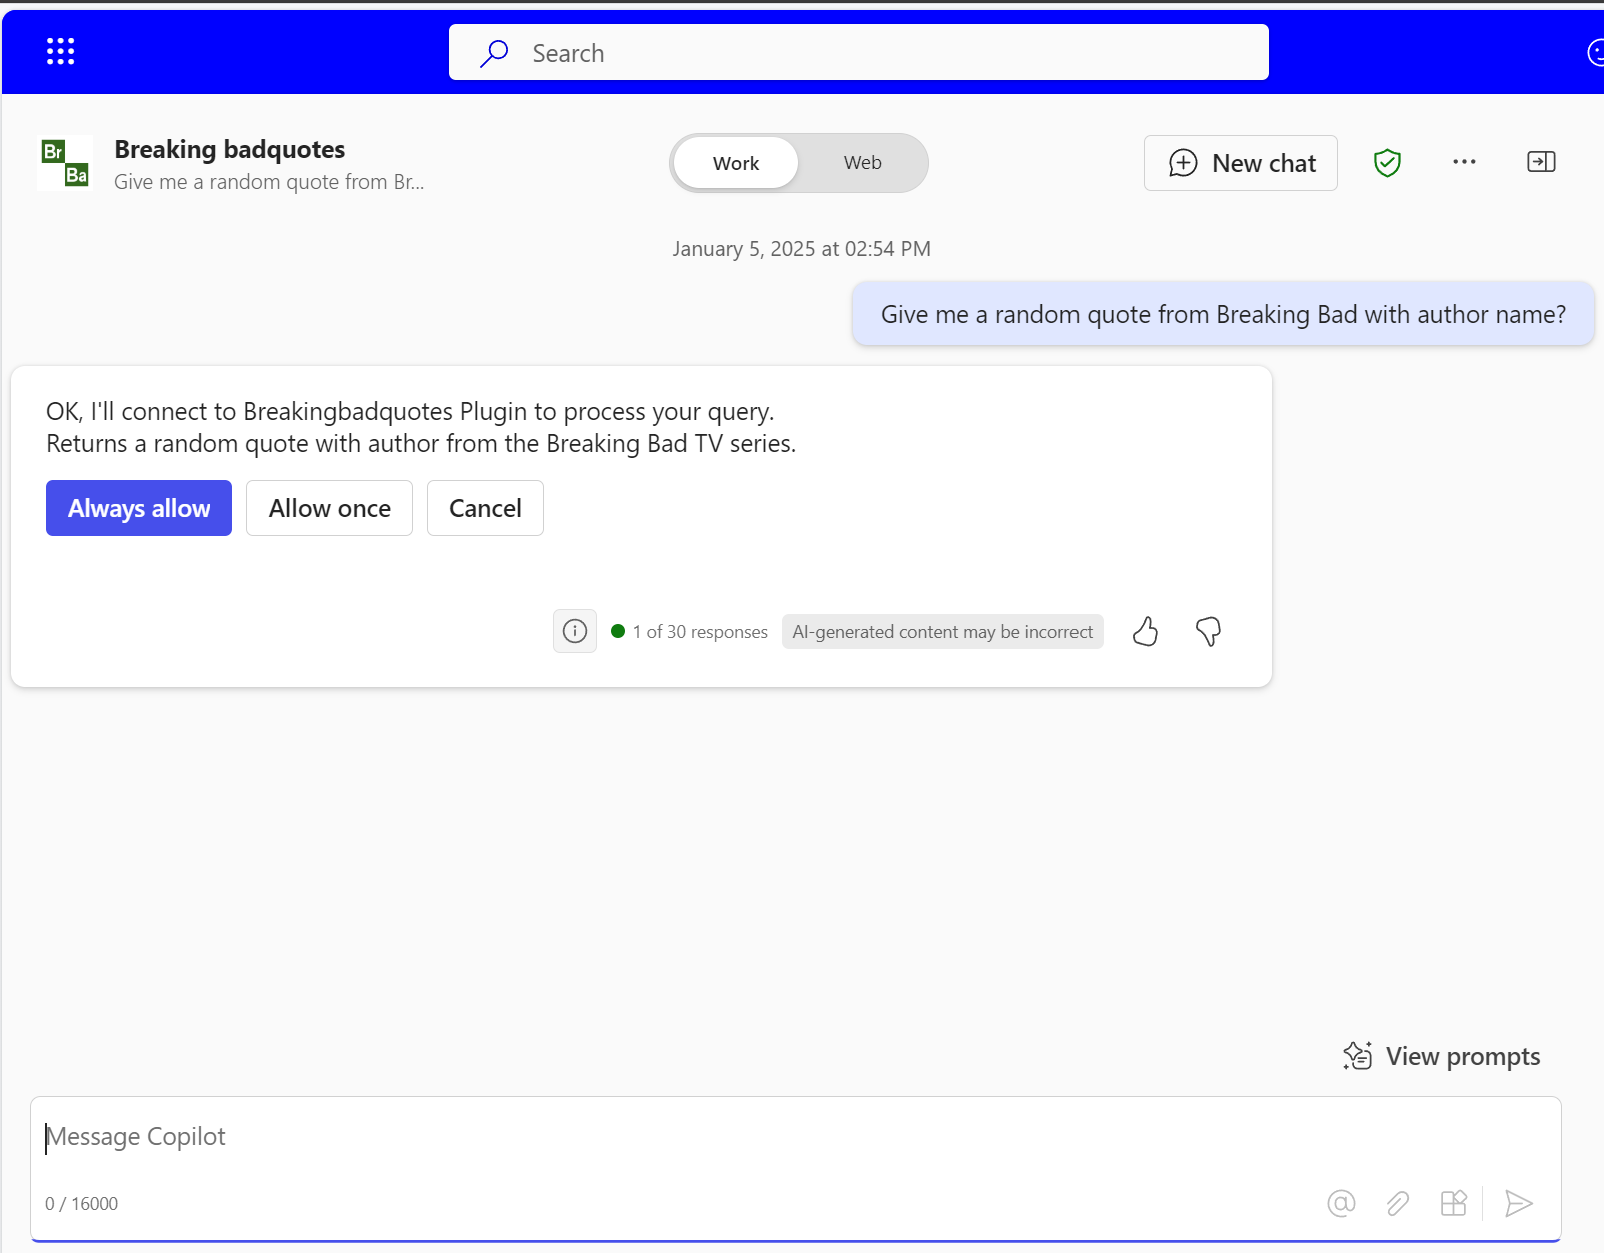
Final Output:

How to Verify if It’s Working and Fetching Data from the API
- Verify via Localhost: Open the terminal in VS Code and click on Start Backend. Once it’s running, you’ll see the local host URL, which should begin with
localhost:7071/api/quotes. Open this URL in your browser, and it will return a JSON response with the quote data. - Verify via Agent Request: Another way to check is by sending a request from the agent. This will invoke the
getQuotefunction, which generates a unique ID each time. The response will include text indicating that the function was programmatically called.
Bonus: How does the breaking bad quotes agent work?
When a user requests a Breaking Bad quote in Microsoft 365 Copilot, the agent works in a few simple steps:
- Manifest Check: The agent starts by checking its task list in the manifest file
- API Connection: It then refers to the API specification to understand how to connect to the Breaking Bad API
- Data Fetch: The agent sends a request to an Azure Function, which fetches a random quote and the author’s name from the API
- Data Return: The quote and author are returned in a structured JSON format
- User Display: Finally, the agent displays the quote clearly in the Copilot interface
Conclusion
It’s been a bit of a ride, hasn’t it? But hey, we’ve finally done it! We have successfully created a declarative agent using the Breaking Bad API, but the process can be applied to any API, including those requiring authentication with API key or OAuth.
if you hit any bumps along the way, don’t hesitate to drop a comment below. If you found this helpful, give it a thumbs up or click on your favorite emoji button below. Good luck, and happy coding!
Appendix
This post is inspired by the following resources: